Showing posts with label Vegetarian. Show all posts

Saturday, March 29, 2014

Therapy

Thankfully the weather is improving.  This has been a horribly long winter.  And though today was gloomy and rainy, spring is in the air.  The birds were out and about, things are looking a bit greener, and my daffodils are poking their little heads through the ground.  I could smell the change in the air!

And when I'm home on a Saturday, and I want a pick-me--up, I cook.  Today was no exception.

I started off making potato soup.  It was  kind of late anniversary celebration as last week was our 42nd wedding anniversary and potato soup is the first thing I ever cooked for us as a married couple.  Mike requested it this morning.  I've posted my mom's potato soup previously and it's VERY good.  I almost always use her recipe when I make potato soup. But today, I wanted a little healthier rendition.  How to get the thick, creamy quality of mom's soup without all the flour and milk and butter?  Then it dawned on me.  If you can thicken gravy (vegetarian that is) with white beans, why couldn't you thicken potato soup with potatoes?  Here's how it goes:

My Mom's Potato Soup with a Twist

  • Good olive oil
  • Potatoes cubed (as many as you want).  I used six large potatoes.
  • onion (about 3/4 cup) minced
  • water or vegetable broth to cover
  • milk of your choice (I used soy milk)
  • salt and pepper
  • good soy margarine or butter
Decide how much soup you want to make and peel and cube about twice as many potatoes as you normally would.  I used six large potatoes today.
Pour about 1 tablespoon oil into a dutch oven and brown onions slightly.  Add cubed potatoes and just barely cover with water or vegetable broth. Season with salt and pepper to taste.  Bring to a boil and cook gently for about 20 minutes.  When potatoes are done, use a potato masher or immersible blender to mash about half of the potatoes. Don't overdo it or you won't have any body left in the soup!
Gently pour in enough milk to make the soup creamy.  It should be thick.  Don't bring to a boil--heat just until warmed.
Just before serving, add a dollop of butter or margarine and swirl.

I guarntee this will replace your current potato soup recipe.

Potato Soup with a Twist


I just have to share this story.  When Mike and I got home from our honeymoon, I set about deciding what to cook for our first supper in our home together.  I couldn't think of a thing.  I called my mother and asked her what I should cook.  When she said potato soup, I felt great relief, because I had cooked it at home many times.  I made the soup, it was good.  One day down... how many more to go?  I realized on that day that I'd have to decide what to have for supper for the rest of my life.  It was scary.  I wonder if young women (or men) even give that a thought today? 


Monday, March 3, 2014

Another Snow Day

Roasted Cauliflower

I read this somewhere in my travels--a doctor's office, or a newspaper.  Unfortunately, I can't remember the source.  But last weekend, when Giant had cauliflower on sale, I thought I'd give it a try.  I really like cauliflower, but Mike isn't too crazy about it.  He still isn't.  But this is my favorite cauliflower recipe now.  I'll definitely do it again.

Directions:
Preheat oven to 325 degrees.
Remove all green parts from cauliflower and thoroughly wash.  Shake dry.  I used parchment paper sprayed with a little olive oil (I made my own little sprayer with a nozzle device from the dollar store) on a baking sheet.
Rub the cauliflower heads with a little oil and salt and pepper to taste. Bake for about 1 hour and 20 minutes, depending on your oven.  Cauliflower should be turning a little brown, but not burnt.  Also, cauliflower should be fork tender.

Serving:
You can serve as is.  The flavor is great.  I made mashed cauliflower with one head--just like you would mashed potatoes.  With the other, I made a Red Curry Cauliflower Soup.  It's Thai and it was very tasty.


Roasted Cauliflower


You know it's a snow day if I'm in the kitchen:

Chocolate Banana Pound Cake

Oh my, oh my.  So I'm looking for a different way to use of excess bananas.  We always have bananas on hand, and I usually make smoothies, or banana bread.  I was tasting for chocolate and so was Mike. My cookbooks were all old-fashioned spiced banana cakes with cream cheese frosting and I just wasn't in the mood for that.  A quick search on the Internet for Chocolate Banana Pound Cake came up with this amazing recipe.  It's from Food.com, and the contributor, Annie Michelle, said it was passed to her by her mother with "a "tad" of embellishment."
I tweaked this a little to try for a "little" healthier version.

Here's the recipe:

Ingredients
1 cup butter (room temperature) I used Earth Balance vegan margarine.
2 large eggs
1 cup sugar
1 cup brown sugar
4 bananas (mashed)
1/3 cup buttermilk I used Kefir.
3 tablespoons vanilla extract
1 teaspoon cinnamon
2 1/2 cups flour I used white whole wheat flour.
2 teaspoons baking soda
1/4 teaspoon salt I didn't use any.
1/3 cup baking cocoa
1 cup boiling water
1-12 ounce bag semi-sweet chocolate chips (This is optional.)
1 cup chopped pecans (Also optional.)

Directions

  1. Preheat oven to 350 degrees.
  2. Grease and flour two 9x5x3 loaf pans.
  3. Cream butter, eggs, sugars, bananas, buttermilk, vanilla, and cinnamon.
  4. Mix together flour, baking soda, salt, baking cocoa, and pecans.
  5. Add dry ingredients to creamed ingredients.  Mix well.
  6. Add boiling water and stir rapidly for 2 minutes. I used my stand mixer on low speed to gently stir for 2 minutes.
  7. Pour batter into loaf pans.
  8. Bake 45 minutes.
  9. Remove from oven (gently) and sprinkle chocolate chips over tops of loaves. Wow, this was a mess.  My pans were so full that the chips kept falling off.  So I actually ended up putting them on at the end after the cake at settled a bit.  It only took a few minutes for the chips to get soft enough to spread.  They actually spread better than the chips that made it to the oven.  Those got a little charred.
  10. Return to oven for about 15 minutes, or until toothpick comes clean when inserted into center of loaf. Again, I'd just bake it through and add the chips at the end.
  11. Remove from oven when finished and place on cooling rack.
  12. Use spatula and spread melted chocolate chips in even layer over the loaves.
  13. Let cool and remove from pans. I sliced in place.  It came out nicely.
  14. You can warm or serve as is.
  15. This recipe could also make 48 small cupcakes.  Bake for 20 minutes and substitute a chocolate frosting.
Nutrition (This is following the original recipe.)
Servings per recipe-24
Calories-214.7
Calories from Fat 76

Total fat 8.4 g, saturated 5.1 g, cholesterol 35.9 mg, sugars 20 g, sodium 209.9 mg, total carbs 32.9 g, dietary fiber 1.3 g, protein 2.5 g

Chocolate Banana Pound Cake
SHOULD I SHARE?

Wednesday, January 22, 2014

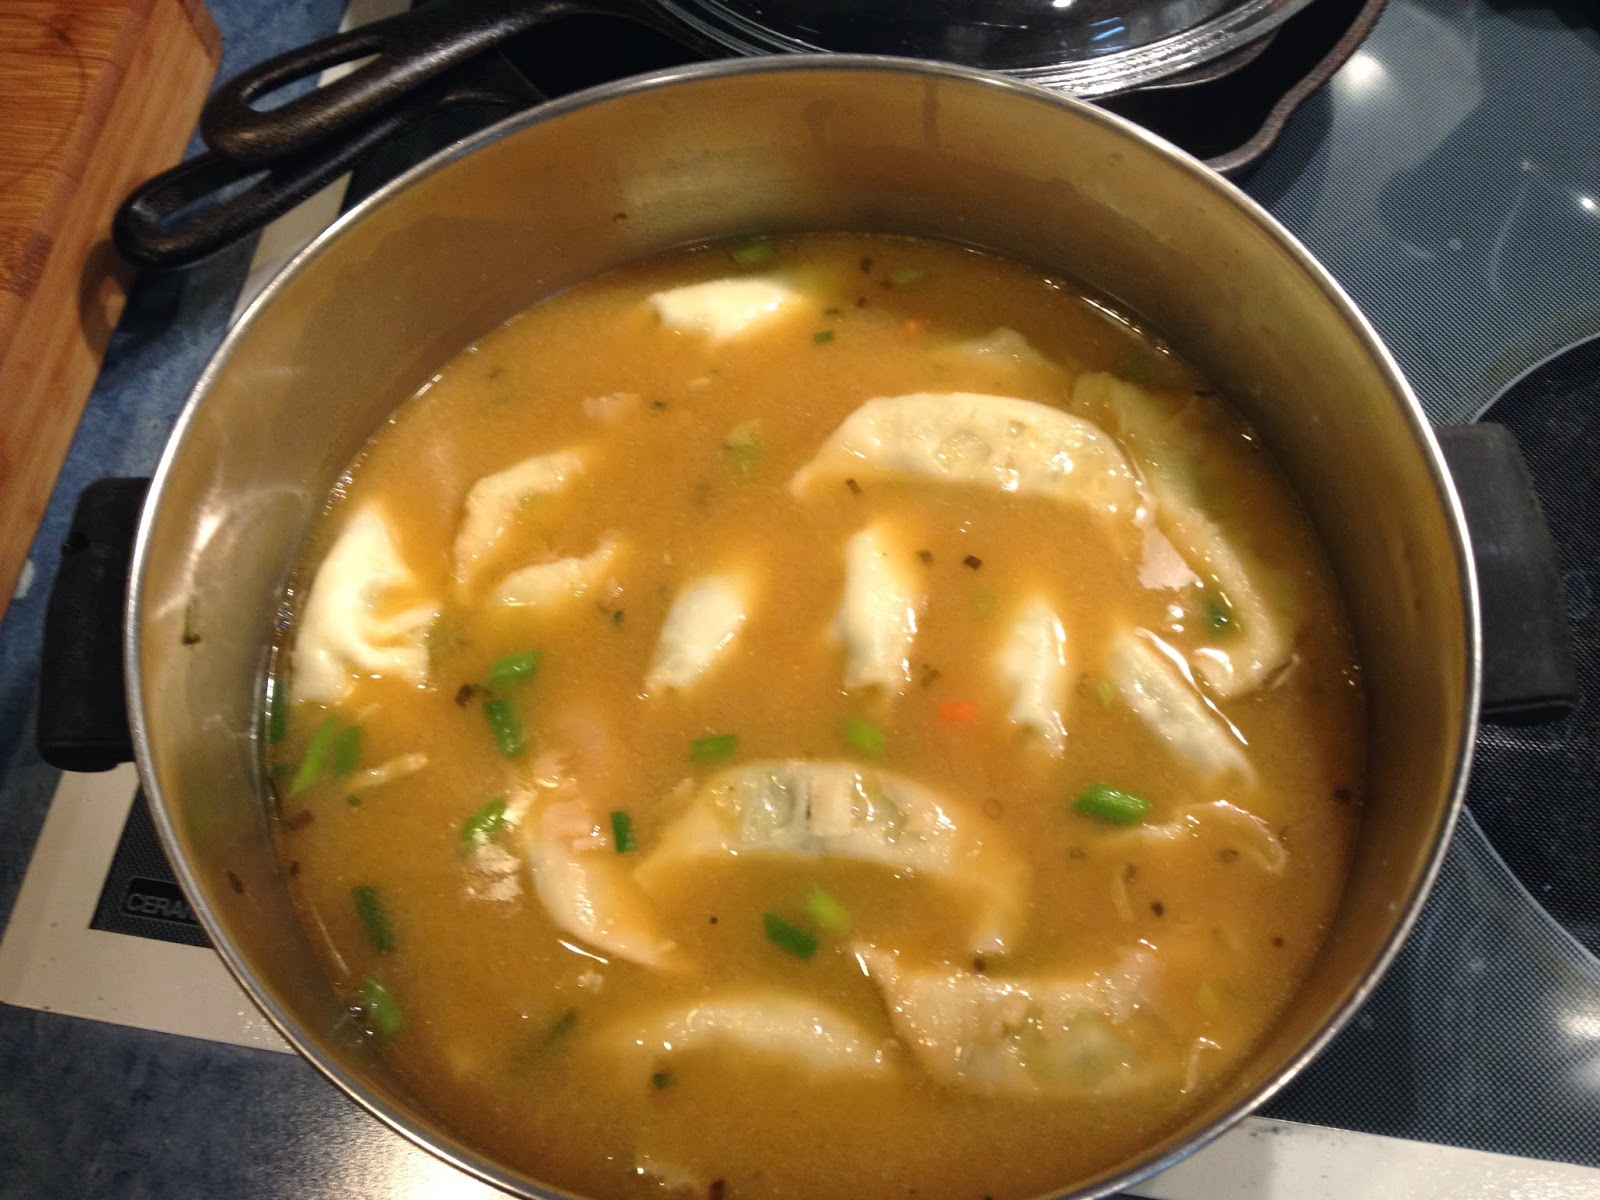
Pot Sticker Miso Soup

I was looking for something quick and hearty for a cold, snowy, winter night.  Then I remembered my PDQ cookbook. I picked one up for Justin in 2007.  He was eating vegetarian and these were super easy.  I tried out a few recipes and it was so good I got one for myself.

From:  The PDQ (Pretty Darn Quick) Vegetarian Cookbook
By:  Donna Klein

Makes 4 servings
Vegan

"Miso is a fermented soy paste that is used frequently in Japanese cooking to flavor and thicken soups and sauces.  While just 1 tablespoon of miso contains 2 grams of protein and 1 gram of dietary fiber, it also contains about 800 milligrams of sodium.  If you are watching your salt intake, use the lesser amount in the recipe.  Vegetarian pot stickers, a ravioli-like Asian pasta, are typically filled with a combination of cabbage, carrots, and radishes.  Both miso and pot stickers can be found in Asian markets as well as specialty and health food stores; I got mine at Trader Joe's."

  • 2 1/2 cups water (*I used whatever vegetable broth I have on hand)
  • 1 14-ounce can low sodium vegetable broth
  • 1 teaspoon freeze-dried chopped chives
  • 8 ounces frozen vegetarian pot stickers
  • 1/2 cup canned straw mushrooms, drained (optional) (*I love these.)
  • 1 1/2 to 2 tablespoons miso, preferably the brown variety, mixed with 2 tablespoons water
  • 1 teaspoon toasted dark sesame oil
In a medium stockpot, bring the water, broth, and chives to a boil over medium-high heat.  Add the pot stickers and mushrooms; stir and return to a boil. Reduce the heat to medium and cook until pot stickers are softened but still firm to the bite, about 3 minutes, stirring occasionally.  Remove from heat and add the miso mixture and sesame oil, stirring well to combine.  (If not serving immediately, keep warm over low heat, but do not allow the mixture to boil.) Serve hot.

Nutritional info:  Calories 135, Protein 9 grams, Total Fat 2 grams, Saturated Fat 0 grams, Cholesterol 0 grams, Carbs 21 grams, Dietary Fiber 2 grams, Sodium  629 milligrams

Variations:
  1. Miso Noodle Soup-- Substitute 2 to 3 ounces somen noodles, broken in half, for the pot stickers.
  2. Miso Soup-- Omit the pot stickers and mushrooms.  After the broth mixture comes to a boil, remove from heat and stir in the miso mixture and sesame oil.  Serve hot.
My note:  I use low-sodium miso.  It still has plenty of of sodium.  I like to serve it with some sort of thick crusty bread or biscuits--though that isn't very Asian.  It's best to use it all up at once.  Trader Joe's pot stickers come in a 16 ounce package.  That makes a lot of soup.  The pot stickers get a bit droopy on the second day, but the flavor is even richer as the miso has time to blend and mellow.

Miso Pot Sticker Soup

*My note.

Saturday, October 5, 2013

Gluten-Free Chickpea Biscuits and Gravy

If you love sausage biscuits and gravy, you'll love this recipe.  No guilt, only good.

Serves 8

Biscuits

  • 1 cup white rice flour, plus more for dusting work surface
  • 1/2 cup chickpea flour
  • 1/2 cup potato starch
  • 1 1/2 tablespoons sugar
  • 1 tablespoon baking powder
  • 1/2 teaspoon salt (optional)
  • 1/4 teaspoon baking soda
  • 2 ounces (1/2 stick) butter or trans-fat-free margarine, cut into small pieces--I use Earth Balance margarine
  • 3/4 cup fat-free buttermilk--I use Kefir, but soy or almond milk with vinegar works well too

Gravy

  • 1 1/2 cups dried chickpeas cooked according to package directions OR 1-15 ounce can chickpeas drained and rinsed--I use canned
  • 2 1/2 teaspoon paprika
  • 2 teaspoon poultry seasoning
  • 1 teaspoon onion powder
  • 1/2 teaspoon salt
  • 1/4 teaspoon ground black pepper
  • 1 pinch cayenne pepper
  • 2 tablespoons vegetable oil
  • 4 tablespoons butter or trans-fat free margarine
  • 1/4 cup potato starch
  • 1/4 cup chickpea flour
  • 4 cups fat-free milk, warmed--I use soy milk
  1. To make biscuits:  preheat oven to 375 degrees.  Coat large baking sheet with cooking spray.
  2. Whisk together rice flour, chickpeas flour, potato starch, sugar, baking powder, salt, and baking soda in large bowl. Cut butter into flour mixture with pastry blender or two knives until no large pieces remain (it should look like you're making pie crust).  Stir in buttermilk.
  3. Pat dough into flat 1-inch-thick disk on rice flour-dusted work surface.  Cut dough into 16 rounds (or rectangles with knife).  Place on baking sheet and back 12 to 15 minutes, or until golden brown on top.
  4. To make gravy: Pulse chickpeas, paprika, poultry seasoning, onion powder, salt, pepper and cayenne in food processor 8 times, or until crumbly.
  5. Heat oil i skillet over medium-high heat.  Add chickpea mixture, and saute' 3 to 5 minutes, or until fragrant and crisp.  Transfer to plate.
  6. Add butter to skillet, and melt over medium heat.  Whisk in potato starch and chickpea flour, and cook 1 to 2 minutes.  Gradually whisk in milk, and cook 3 to 5 minutes, or until sauce is thickened whisking constantly.  Stir in chickpea mixture.  Season with salt and pepper if desired.
  7. To serve:  Place 2 biscuits on each plate.  Ladle 1/4 cup gravy over top (or more if desired).
Nutritional Information:

397 calories; 11 g protein; 17 g total fat (8 g saturated fat); 54 g carbs; 33 mg cholesterol; 721 mg sodium; 4 g fiber; 12 g sugars

Taken from Vegetarian Times.


Photo from Vegetarian Times.

Sunday, June 2, 2013

Seven-Layer Tortilla Pie


I can't say enough about this pie.  It's so good! Way back in 1997, when I first started thinking about becoming vegetarian, I found this recipe in Cooking Light. I subscribed to that magazine for years and found many, many, tasty and easy recipes that I could use at home.  Some recipes are good, but so troublesome to make that I just give up and don't make them.  And while this one takes a little more prep than usual, it's well worth it.
The other great thing about this recipe, is that everybody else liked it too.  Back in those days I used to do a meatless meal once or twice a week.  I feel so much better eating non-meat proteins. But that's not me trying to be preachy.  Eat what you like--just eat moderately--whatever it is!

It took me about 10 years to gradually make the leap to vegetarian, but I'm glad I did.

Seven-Layer Tortilla Pie

  • 1 tablespoon olive oil
  • 1 cup chopped red bell pepper
  • 3/4 cup chopped green bell pepper
  • 1/2 cup chopped red onion
  • 1/2 cup chopped seeded Anaheim chopped green chilies, drained (I've been using jalapenos that I keep frozen in a large plastic bag. Don't chop them or anything--just pop them in the freezer whole. They keep well.  Be sure to wear gloves to chop hot peppers and don't rub your eyes.)
  • 2 tablespoons minced fresh cilantro
  • 1 teaspoon dried oregano
  • 1 teaspoon chili powder
  • 1/2 teaspoon ground cumin
  • 2 cups no-salt added tomato juice (Today I didn't have tomato juice so I put some leftover sun-dried tomatoes in the blender and added vegetable broth enough to make two cups. The flavor of the sauce was fantastic.)
  • 2-15 ounce cans black beans, drained
  • 2-15 ounce cans cannellini or other white bean well-drained. Or other white bean.
  • 1 cup (4 ounces) shredded reduced-fat Monterey Jack cheese
  • 1 cup (4 ounces) shredded reduced fat sharp cheddar cheese
  • cooking spray
  • 7- 8 inch flour tortillas
  • Cilantro sprigs
  1. Heat oil in a large nonstick skillet over medium heat.  Add bell peppers, onion, and next five ingredients (onion through cumin); saute 5 minutes or until tender.  Add juice; cook 8 minutes or until reduced to 2 1/2 cups.
  2. Combine black beans and half of tomato juice mixture in a bowl; stir well.  Stir cannellini beans into remaining tomato juice mixture.  Set both aside.
  3. Preheat oven to 325 degrees.
  4. Combine cheeses in a bowl.  Toss well.
  5. Line a 9-inch pie plate with foil.  NEWS FLASH: THE FIRST TIME I TRIED THIS I USED A PIE PLATE.  THE PLATE JUST ISN'T BIG ENOUGH.  I USE A 12-INCH CAST IRON SKILLET.  IT WORKS PERFECTLY.  Using heavy duty aluminum foil, tear off pieces big enough that you'll be able to wrap and seal.  You should have two pieces of foil, forming a cross, so to speak, and fitted lightly into the pan. Lightly spray all surfaces of foil with cooking oil.
  6. Place one tortilla in bottom of pan.  Spread 1 cup of cannellini beans over tortilla.  Sprinkle with 1/4 cup of cheese mixture.  Place one tortilla over cheese, pressing gently.  Spread 1 cup black bean mixture over tortilla; sprinkle with 1/4 cup cheese.  Continue in this order, pressing lightly after each layer.  End with black beans and cheese.
  7. Bring up edges of foil and fold to seal.  There should be no tortilla or mixture exposed.  Bake at 325 degrees for 40 minutes.  Remove from oven, and let stand, covered, for 10 minutes.
  8. Remove foil packet from pan and unwrap pie.  Slide onto a serving plate and cut into wedges.  Garnish with more cilantro if desired.
8 servings (1 wedge equals a serving)

Nutritional Info: 423 calories (23% from fat); fat 11 g; protein 24.5 g; carbs 59.3 g; fiber 7.4 g; chol 18 g; iron 5 g;sodium 758 mg; calc 353 mg

You can cut fat and cholesterol by using less cheese or faux cheese (I happen to like half faux and half regular--I can't abide that reduced fat stuff).  You can also cut sodium by using unsalted beans.